First Application Configuration in PHP Laravel 7
Main folders that we are using in our PHP Laravel 7 Project
Laravel project architecture follows a Model - View- Controller pattern and it fully focused to seperate logic part of application from the user interface.
The main folder used in our laravel projects are:
app,database,resources,routes, .env file
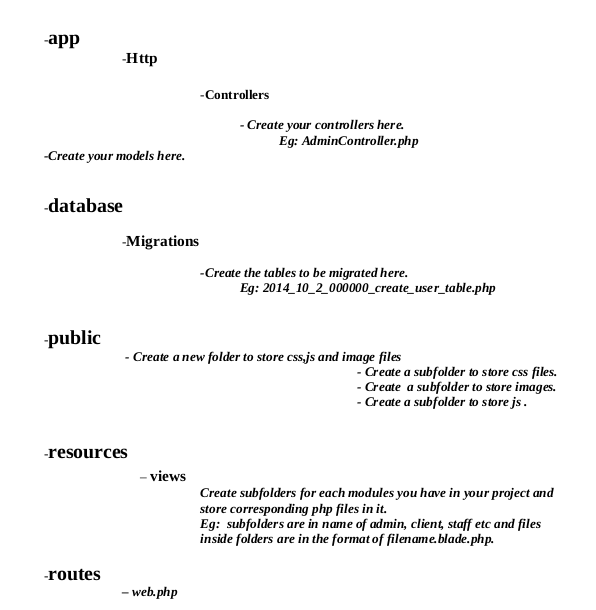
app - The app directory holds the base code for your Laravel application.Models are stored in this folder.The model is usually a class with properties that match the columns in your database, and the relationship between models can also be defined within these files.
database - The database directory holds your database files.
public- The public directory helps to start your Laravel project and maintains other necessary files such as JavaScript, CSS, and images of your project.
resources - The resources directory holds all the Sass files, language (localization) files, templates (if any).
routes- The routes directory contain all your definition files for routing, such as console.php, api.php, channels.php, etc.
Http- The Http directory holds different filters, requests, and controllers.
First configuration of your Laravel Project
These are some basic steps that you should follow while creating your first laravel project.
In browser type, localhost/phpmyadmin, there login with your username and password, then create a database for your project.
Then in your Laravel Project,
In .env file,edit db connection details by adding your php myadmin username and password, and recently created database name.
DB_CONNECTION=mysql
DB_HOST=127.0.0.1
DB_PORT=3306
DB_DATABASE=Your_Database_Name
DB_USERNAME=Your_Username
DB_PASSWORD=Your_Password
Next, we are going to create a table in your project database.For that first you should create a model.
For that, go to terminal ,cd /var/www/html/your_project_folder , type
$ php artisan make:model ModelName -m
And an app/ModelName.php file and in database/migrations/ 2020_12_10_193602_create_modelnames_table.php will be generated.
Now in database/migrations/ 2020_12_10_193602_create_modelnames_table.php ,add the columns you wanted in table, for that in function up(), type command
$table->string('column_name');
public function up()
{
Schema::create('modelnames', function (Blueprint $table) {
$table->id();
$table->string('column1');
        $table->string('column2');
        $table->string('column3');
        $table->timestamps();
    });
Then to migrate this table to database that we created,
For that, go to terminal ,cd /var/www/html/your_project_folder , type
$php artisan migrate
Now ,table is migrated to database, and you could check it by going to phpmyadmin mysql database.
To make every column fillable through our projects,
in app/ModelName.php file,
class ModelName extends Model
{
//
Protected $fillable = [   'id','column1','column2','column3','created_at','updated_at'
];
}
To display the first page created in PHP Laravel
Now we are going to create a simple view to display our user data. In app/views, create a new folder that has name of one of your module.
eg: admin,client..etc.
Here I am creating a folder named admin.
In app/views/admin , here I am creating 2 views
layout.blade.php
In layout.blade.php,
Making Layout
In mymodel.blade.php
@extends('layout')
@section('content')
My Models
@endsection
To display the page in browser you have to set route, for that go to Route/web.php
add route here.
Route::get('/admin/ModelView', function () {
return view('admin.mymodel');
});
Here admin.mymodel means mymodel resides in admin folder and this is the url '/admin/ModelView' of that page.
To view this page on browser,
first go to terminal , then in project folder,
type php artisan serve.
shinimol@shinimol-Lenovo-G50-80:~$ cd /var/www/html/sample/
shinimol@shinimol-Lenovo-G50-80:/var/www/html/sample$ php artisan serve
Laravel development server started: http://127.0.0.1:8000
[Sat Dec 12 11:28:28 2020] PHP 7.4.9 Development Server (http://127.0.0.1:8000) started
Now go to your browser and type http://127.0.0.1:8000/admin/ModelView, you could view your newly created page.
To insert data from Form to Mysql database
Here I am going to create a form in admin module, so in resources/views/admin I created a new file name addmodel.blade.php
I already created, a table named 'modelnames' and it contains 3 columns, column1, column2, column3
So in resources/views/admin/ addmodel.blade.php
add the form
Here in the form , action={{ route('AddModel') }}, AddModel is the name of route.
@csrf is used to pass tokens in each sessions.
form method="POST" action="{{ route('AddModel') }}">
                        @csrf
                        @if($message = session('message'))
{{ $message }}
@endif @if($message = session('errormessage'))
{{ $message }}
@endif
{{ __('Column1 Name') }}
@error('column1') {{ $message }} @enderror
{{ __('Column2 Name') }}
@error('column2') {{ $message }} @enderror
{{ __('Column3 Name') }}
@error('column3') {{ $message }} @enderror
@csrf @if($message = session('message'))
{{ $message }}
@endif @if($message = session('errormessage'))
{{ $message }}
@endif {{ __('Column1 Name') }}
@error('column1') {{ $message }} @enderror
{{ __('Column2 Name') }}
@error('column2') {{ $message }} @enderror
{{ __('Column3 Name') }}
@error('column3') {{ $message }} @enderror
{{ __('Create') }}
Now In route/web.php, set the route
Route::post('/admin/model/add','AdminController@AddModelfunction')->name('AddModel');
AddModel is the route name
AddModelfunction is the function written in AdminController to insert data in database.
AdminController is the controller which controlls the model admin,
To create AdminController, in terminal type
shinimol@shinimol-Lenovo-G50-80:~$ cd /var/www/html/sample/
shinimol@shinimol-Lenovo-G50-80:/var/www/html/sample$ php artisan make:controller AdminController
Now in AdminController, write function,
 public function AddModelfunction(Request $request){  //Request is used because we are using post method in form

        $modelname=new ModelName; //'ModelName' is the name of model and 'modelname' is the object

    $modelname->column1 = $request->column1; // $request->column1, here column1 is the name of textfield that holds value
    $modelname->column2 = $request->column2;// $modelname->column2 . here column2 is the name of the column of table modelnames
    $modelname->column3 = $request->column3;
       $modelname->save();
    return redirect()->route('AddModel')->with('message','A New Model Added Successfully');


}
Now in browser type, http://127.0.0.1:8000/admin/model/add
You will see a form, you could enter details there and click on submit button.
Now , control will pass from route in web.php specified in form action, from there control will pass to function in controller specified in route. Then insertion completed successfully, and successfull message will shown to our page due to @csrf in our form.